Failed to load the JNI shared library "C:\Program Files (x86)\Java\jdk1.6.0_20\bin..\jre\bin\client\jvm.dll".
-vm
C:\Program Files\Java\jre6\bin\javaw.exe
2 Eclipse Plugins that I couldn't live without
- AnyEdit:
- http://andrei.gmxhome.de/eclipse/
- Convert Tabs <-> Spaces
- Compare/Replace with external file or open editor
- StartExplorer
- http://startexplorer.sourceforge.net/update/
- Open file in Windows Explorer
- Copy full path
How To Move Off-Screen Windows Back To Your Desktop
My home PC only has one monitor, but my workstation has 2 monitors. So when I remote to my workstation, and I will only be able to see only screen. Here is the trick:
Select the window that only shows in the other screen, click Move, now press ->.
If the window doesn't show "Move", you could use 'ALT+SPACE+M' to activate Move option.
Select the window that only shows in the other screen, click Move, now press ->.
If the window doesn't show "Move", you could use 'ALT+SPACE+M' to activate Move option.
Default Windows 7 Login Screen
C:\Windows\System32\oobe\Info\Backgrounds\backgroundDefault.jpg
File Size could be more than 256KB
File Size could be more than 256KB
Error starting modern compiler
This error is caused by eclipse using a different java VM than the one JAVA_HOME is pointing to.
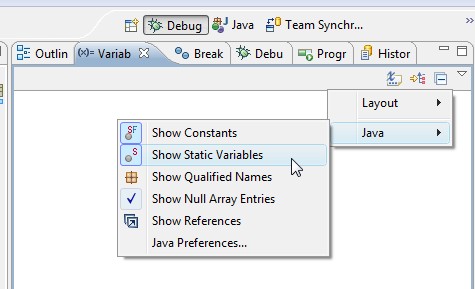
Eclipse Debugging - show static variable values
I just noticed that when I do debugging in Eclipse, when I moved the mouse over some static variables, the values are not showed up. Here is the fix:

How to drop database (schema) in Oracle
//List all schema:

SELECT username FROM all_users ORDER BY username;

//Drop table test_db

drop user test_db cascade;
Steve Jobs and Technology
I am a developer, and my passion is to use the best possible technology to write useful and beautiful applications for my customers, and I hope my applications are good enough that my customers would love to pay for them.
I recently watched some video about Steve Jobs. One of them is he is promoting iPod Nano, the other is he is promoting iPhone. As I watched, I could not help thinking what a great salesman Mr. Jobs are. He has an almost unmatched ability to sell stuff to millions of people, of course, the stuff that he is selling is really good stuff.
Jeff Bozos said his company (Amazon) is customer obsessed.
To understand, technology is the tool, not the goal, customer is the goal.
That's the difference between Steve/Jeff and geeks. That's the mindset shift that we geeks should make.
The question we should ask is, what I could do to help customers? what values I could bring to customers? how much time that I could save for customers? what convenience that I could give to customers? If your customers are happy and satisfied, trust me on this, you will be happy at the end.
Python Notes
- difference between raw_input and input: raw_input takes everything as string, while input treat everything as non-string or expression.
- str() or `` or repr(): convert other types into string
- import math, math.sqrt(81)
- family=['mom','dad','brother'] family[-1]='brother'
- 'abcd'[-1] = 'd'
Microsoft DOS Command
dir /?
or any command + /?
cd /d J:/test: this will change Drive too, could not do it by cd J:/test
using del or erase to delete a folder, it will only delete the files under this folder, but the folder will remain. To delete folder, you need rmdir.
use rmdir /s or rd/s will delete the whole dir (including sub)
To create a file from CMD, echo "test" > test.txt
To display a file: type test.txt
CTRL + Break: stop execution
ren: rename
move:move file
pushd .
cd /
popd
even better
pushd /
popd
Pushd: Stores the name of the current directory for use by the popd command before changing the current directory to the specified directory.
or any command + /?
cd /d J:/test: this will change Drive too, could not do it by cd J:/test
using del or erase to delete a folder, it will only delete the files under this folder, but the folder will remain. To delete folder, you need rmdir.
use rmdir /s or rd/s will delete the whole dir (including sub)
To create a file from CMD, echo "test" > test.txt
To display a file: type test.txt
CTRL + Break: stop execution
ren: rename
move:move file
pushd .
cd /
popd
---this will help you remember where you were.
even better
pushd /
popd
Pushd: Stores the name of the current directory for use by the popd command before changing the current directory to the specified directory.
pushd + <the path you want to go>
Popd: change back to dir that Pushd stores.
type help, will display all dos commands.
type help, will display all dos commands.
Install Eclipse Plugins
Sometimes, you just could not be able to install Eclipse Plugin through Help->Install New Software, then type in the URL, for example, StartExplorer plugin.
This is one of my favorite plugins. The way to do this is simply download the jar file, and drop it into C:\Program Files\eclipse\eclipse3.6.1\plugins folder, then restart Eclipse. That's it.
Sometimes, you need check "Available Softwares sites", make sure the site is not disabled.
This is one of my favorite plugins. The way to do this is simply download the jar file, and drop it into C:\Program Files\eclipse\eclipse3.6.1\plugins folder, then restart Eclipse. That's it.
Sometimes, you need check "Available Softwares sites", make sure the site is not disabled.
Convert Java project to Maven project
Installing m2eclipse
(Just so you know, STS comes with this plugin already, whew!)
Select Java project, right click, maven->Enable Dependency Management.
Or you could New->Maven->Maven POM File
To create a new Maven project
New->Maven->Maven Project
You could choose which archetype you want to generate, there a lot of them!!!!
You could also run maven command in Eclipse, by using Run as, Maven Build, you could specify your goal.
Maven Archetype Plugin
mvn archetype:generate -DgroupId=com.mycompany.app -DartifactId=my-app -DarchetypeArtifactId=maven-archetype-quickstart -DinteractiveMode=false
mvn archetype:create-from-project
mvn archetype:create-from-project
Maven in 5 minutes
http://maven.apache.org/guides/getting-started/maven-in-five-minutes.html
Create maven-driven project in one command:
mvn archetype:generate -DgroupId=com.mycompany.app -DartifactId=my-app -DarchetypeArtifactId=maven-archetype-quickstart -DinteractiveMode=false
Create maven-driven project in one command:
mvn archetype:generate -DgroupId=com.mycompany.app -DartifactId=my-app -DarchetypeArtifactId=maven-archetype-quickstart -DinteractiveMode=false
All plugins in Maven 2.0 look much like a dependency - and in some ways they are. This plugin will be automatically downloaded and used - including a specific version if you request it (the default is to use the latest available).
Take a look at STS's "Effective POM" view, you can understand what plugin, phase, and goal.
You must specify a valid lifecycle phase, or a goal in the format plugin:goal or pluginGroupId:pluginArtifactId:pluginVersion:goal
mvn test-compile
mvn:compiler:testCompile
mvn org.apache.maven.plugins:maven-compiler-plugin:2.3.2:testCompile
mvn test-compile
mvn:compiler:testCompile
mvn org.apache.maven.plugins:maven-compiler-plugin:2.3.2:testCompile
Spring Roo with MySQL (DB Reverse Engineering)
- Be Noted: all the tables in the given schema, their primary key need to be auto_increment.
- create project weddingMySQLRE
- persistence setup --provider HIBERNATE --database MYSQL --databaseName guestdb --userName root --password secret
- change <property name="hibernate.hbm2ddl.auto" value="create"/> to <property name="hibernate.hbm2ddl.auto" value="update"/> in /src/main/resources/META-INF/persistence.xml
- database introspect --schema guestdb
- Located add-on that may offer this JDBC driver
- 1 found, sorted by rank; T = trusted developer; R = Roo 1.1 compatible
- addon install id --searchResultId 01
- database introspect --schema guestdb
- database reverse engineer --schema guestdb --package ~.domain
- controller all --package ~.web
- add weddingMySQLRE project into server, and start server
- http://localhost:8080/weddingMySQLRE
Thoughts: It's a little bit difficult to do DBRE on oracle, that's because Spring Roo does not provide OSGi drivers for Oracle and DB2. So we have to either obtain an OSGi-enabled driver or wrap the
driver using Roo's wrapping facility. See the following links to see how to do it:
http://saber.b2b2000.com/display/BLUE/2011/01/26/Roo+reverse+engineering+on+Oracle
driver using Roo's wrapping facility. See the following links to see how to do it:
http://saber.b2b2000.com/display/BLUE/2011/01/26/Roo+reverse+engineering+on+Oracle
http://static.springsource.org/spring-roo/reference/html/base-dbre.html
http://detailfocused.blogspot.com/2011/02/wrap-jar-file-for-osgi-by-spring-roo.html
Based on this, I decide to use MySQL, which has Spring Roo's full support.
http://detailfocused.blogspot.com/2011/02/wrap-jar-file-for-osgi-by-spring-roo.html
Based on this, I decide to use MySQL, which has Spring Roo's full support.
Spring Roo with MySQL
- create project weddingMySQL
- persistence setup --provider HIBERNATE --database MYSQL --databaseName guestdb --userName root --password secret
- change <property name="hibernate.hbm2ddl.auto" value="create"/> to <property name="hibernate.hbm2ddl.auto" value="update"/> in /src/main/resources/META-INF/persistence.xml
- entity --class ~.domain.Rsvp
- field string code --notNull --sizeMin 1 --sizeMax 30
- field string email --sizeMax 30
- field number attending --type java.lang.Integer
- field string specialRequests --sizeMax 100
- field date confirmed --type java.util.Date
- entity --class ~.domain.MyTable --identifierField cid --identifierColumn CID --table testtable (could not use domain.testXXX)
- field string company --sizeMax 40
- controller scaffold ~.web.RsvpController
- controller scaffold ~.web.MyTableController
- add wedding2 project into server, and start server
- http://localhost:8080/weddingMySQL
MySQL Installation and Configuration
1. download mysql (mysql-5.5.13-win32.zip).
2. unzip it into C:\mysql-5.5.13-win32\
3.put c:\mysql-5.5.13-win32\bin in PATH
4. in cmd, mysqld.exe (this will start mysql server)
5. mysql -u root -p (this will login you in as root, the password is blank)
6. create database guestdb; (this will create a database named as "gestdb")
You can change root password by using
UPDATE mysql.user SET Password=PASSWORD('') WHERE User='root';
FLUSH PRIVILEGES;
Now we have mysql good to go.
Spring Roo Using Real Existing Oracle Database
I have this table Candidate (CID, Name, COL3), be noted, I don't have ID and Version there.
- create new Root project: Project name: wedding4Real; Top Level: com.wedding
- open roo shell
- persistence setup --provider HIBERNATE --database ORACLE --databaseName XE --userName practice_db --password secret
- change <property name="hibernate.hbm2ddl.auto" value="create"/> to <property name="hibernate.hbm2ddl.auto" value="update"/> in /src/main/resources/META-INF/persistence.xml
- entity --class ~.domain.Candidate --identifierField cid --identifierColumn CID --table Candidate
- add versionField ="", like @RooEntity(identifierField = "cid", identifierColumn = "CID", versionField = "", table = "Candidate") in /wedding4Real/src/main/java/com/wedding/domain/Candidate.java
- field string Name
- field string COL3
- controller scaffold ~.web.RsvpController
- NullPointerException at org.springframework.roo.addon.web.mvc.controller.WebScaffoldMetadata.getDatePatterns(WebScaffoldMetadata.java:1231)
- This seems a known defect found in 1.1.1 version.
- Switch to Spring Roo 1.1.4 version, and retry
- Confirmed: this is working after 1.1.1 version.
- add wedding project into server, and start server
- http://localhost:8080/wedding4Real
Thoughts: look like this will not work in Spring Flex, since the most recent Spring Flex Addon is only compatible up to 1.1.1 version. So we'll have to wait for Spring Flex Addon to work with the real existing table (which means no version\ID columns).
Spring Roo Flex Using Existing Oracle Database
- create new Root project: Project name: weddingFlex; Top Level: com.wedding
- open roo shell
- persistence setup --provider HIBERNATE --database ORACLE --databaseName XE --userName practice_db --password secret
- change <property name="hibernate.hbm2ddl.auto" value="create"/> to <property name="hibernate.hbm2ddl.auto" value="update"/> in /src/main/resources/META-INF/persistence.xml
- flex setup
- entity --class ~.domain.Rsvp
- field string code --notNull --sizeMin 1 --sizeMax 30
- field string email --sizeMax 30
- field number attending --type java.lang.Integer
- field string specialRequests --sizeMax 100
- field date confirmed --type java.util.Date
- flex remoting all --package ~.service
- add weddingFlex project into server, and start server
- http://localhost:8080/weddingFlex/weddingFlex_scaffold.html
Spring Roo Using Existing Oracle Database
I have tested this in both Spring Roo 1.1.1 and 1.1.4.
- create new Root project: Project name: wedding2; Top Level: com.wedding
- open roo shell
- persistence setup --provider HIBERNATE --database ORACLE --databaseName XE --userName practice_db --password secret
- change <property name="hibernate.hbm2ddl.auto" value="create"/> to <property name="hibernate.hbm2ddl.auto" value="update"/> in /src/main/resources/META-INF/persistence.xml
- entity --class ~.domain.Rsvp
- field string code --notNull --sizeMin 1 --sizeMax 30
- field string email --sizeMax 30
- field number attending --type java.lang.Integer
- field string specialRequests --sizeMax 100
- field date confirmed --type java.util.Date
- controller scaffold ~.web.RsvpController
- add wedding2 project into server, and start server
- http://localhost:8080/wedding2
Spring Roo Notes without Flex
We are going do this from STS based on this
This is the most simple version:
This is the most simple version:
- create new Root project: Project name: wedding; Top Level: com.wedding
- open roo shell
- persistence setup --provider HIBERNATE --database ORACLE --databaseName XE --userName practice_db --password secret
- entity --class ~.domain.Rsvp
- field string code --notNull --sizeMin 1 --sizeMax 30
- field string email --sizeMax 30
- field number attending --type java.lang.Integer
- field string specialRequests --sizeMax 100
- field date confirmed --type java.util.Date
- controller scaffold ~.web.RsvpController
- add wedding project into server, and start server
- http://localhost:8080/wedding
Spring-Flex-Addon: using existing database
Here is a good link
The workaround is:
shutdown roo at this point, and manually create Toy.as.
Well, still not work, first, wipe all the existing data, second, could not add new entry from GUI.
- persistence setup --provider HIBERNATE --database ORACLE --databaseName XE --userName practice_db --password secret
- comment out <property name="hibernate.hbm2ddl.auto" value="create"/> in /TestRoo/src/main/resources/META-INF/persistence.xml
- flex setup
- entity --class ~.domain.Toy --identifierField id --identifierColumn ID --table Toy
- field string DESCRIPTION --notNull
- field string MANUFACTER
- field number version --type java.lang.Integer
- flex remoting all --package ~.service
The workaround is:
shutdown roo at this point, and manually create Toy.as.
Well, still not work, first, wipe all the existing data, second, could not add new entry from GUI.
The complete notes to use Spring-Flex Addon (4)
If there is any problem.
You might need add the following into pom.xml
You might need add the following into pom.xml
The complete notes to use Spring-Flex Addon (3)
Use STS sts-2.6.0.SR1 + Flash Builder 4.5
Be Noted: STS has to be 32 bit.
Be Noted: STS has to be 32 bit.
- Install Flash Builder 4.5 (there is no plugin version now.)
- Run C:\Program Files (x86)\Adobe\Adobe Flash Builder 4.5\utilities\Adobe Flash Builder 4.5 Plug-in Utility.exe
- Choose C:\springsource\sts-2.6.0.SR1 as Eclipse folder
Now open STS, now you should have Flash View.
- Make sure 1.6 Java SDK as the default JRE
- Make sure using Roo 1.1.1.RELEASE
- New->Spring Roo project
- Project name: election 2012, Top level package name: com.hempire
- Maven support: Dependency management only
- Click Finish
- Open Roo Shell
- persistence setup --provider HIBERNATE --database ORACLE --databaseName XE --userName practice_db --password secret
- flex setup
- entity --class ~.domain.Candidate --testAutomatically
- field string name --notNull
- flex remoting all --package ~.service
Open servers View, select SpringSource tc Server, right click, Add and Remove, add election2012 project.
start the server.
Select election2012 project, right click, Run As, Web Application. Application will open.
The complete notes to use Spring-Flex Addon (2)
From command line
- mkdir eclection2012
- cd eclection 2012
- roo
- project --topLevelPackage com.hempire --projectName election2012
- persistence setup --provider HIBERNATE --database ORACLE --databaseName XE --userName practice_db --password secret
- flex setup
- entity --class ~.domain.Candidate --testAutomatically
- field string name --notNull
- flex remoting all --package ~.service
- exit
- mvn compile
- mvn tomcat:run
- http://localhost:8080/election2012/election2012_scaffold.html
The complete notes to use Spring-Flex Addon (1)
Prerequisites:
1. Java JDK 1.6 (I suppose 1.5 is OK too).
2. Maven 2.09 or above.
3. Install ojdbc jars
mvn install:install-file -Dfile=C:\bea\weblogic92\server\lib\ojdbc14.jar -DgroupId=com.oracle -DartifactId=ojdbc14 -Dversion=10.2.0.2 -Dpackaging=jar -DgeneratePom=true
mvn install:install-file -Dfile=C:\bea\wlserver_10.3\server\lib\ojdbc6.jar -Dpackaging=jar -DgroupId=com.oracle -DartifactId=ojdbc6 -Dversion=11.1.0
4. Set up spring-roo with spring-flex-addonWe have 2 options here.
a. Spring Roo 1.1.0.M1 + Spring-Flex-Addon-1.0.0.M1
- put org.springframework.flex.roo.addon-1.0.0.M1.jar under C:\springsource\spring-roo-1.1.0.M1\bundle
- C:\springsource\spring-roo-1.1.0.M1\bin in PATH
- put org.springframework.flex.roo.addon-1.0.0.BUILD-20110219.075648-225.jar under C:\springsource\spring-roo-1.1.1.RELEASE\bundle
- C:\springsource\spring-roo-1.1.1.RELEASE\bin in PATH
We will use option b, since the new versions of STS are only compatible with Spring Roo 1.1.1.RELEASE.
5. Setup database
- SQL> connect
- Enter user-name: system
- Enter password:
- Connected.
- SQL> create user practice_db identified by secret;
- User created.
- SQL> grant dba to practice_db;
- Grant succeeded.
Subscribe to:
Posts (Atom)